Transformations – Basic maps functionalities (Document mapping)

There are several mapping functionalities that you can perform inside maps like Data normalization, Transform Injection (XLST injection), calculating values covering math and scientific functoids and so on but most of the times transformation are quite simples and when we perform a transformation of a message there are 5 basic functionalities that typically arise:

  • Simple mapping of a given value (direct copy)
  • Concatenation of values
  • Conditional selection
  • Custom scripts
  • Add new values (data)

Simple mapping of a given value (direct copy)
This is the most basic operation of all, where we intend to move a value from the source to the destination schema, without perform any kind of transformation on the value (direct copy or simple drag-and-drop).

For this we need to just drag-and-drop the elements in source schema to the elements in the destination schema.

DirectLinks

Concatenation of values

Concatenation means combaining the two values. In maps this is done by using concatenation functoid.

Concatenating two or more values from the source to a particular element in the destination schema is another of the regular operations in mapping, for this we need to:

  • Open the Toolbox window and drag the String Concatenate Functoid onto the grid;
  • Drag-and-drop a link of the desired elements from the source to the String Concatenate Functoid, for example the elements: “A” and “B”;
  • Drag-and-drop a link from the String Concatenate Functoid to the element “A” in the destination schema;

Concatination

Note: the order of the input to the functoid is very important since the concatenation is carried out by the order in which the elements were associated to the functoid (we will explore this topic further on).

Conditional selection

Often we don’t want to simply move values from source to destination schema and sometimes we need to generate data output according to certain conditions. We can make these conditions in many different ways using functoids or through custom scripts, here’s an example: test whether the value in the source is a valid string, if so map it to the destination schema, for this we need to:

  • Open the Toolbox window and drag the Logical String functoid onto the grid, this functoid validates whether the input parameter is a valid string, similar to the C# function String.IsNullOrEmpty.
    • Returns “False” if the string is empty or null;
    • Returns “True” if the value specified by the input parameter is a valid string;
  • Drag-and-drop a link of the desired element from the source to the Logical String functoid, in this case, the element “ZipCode”
  • Drag the Value Mapping functoid from the Toolbox window onto the grid. This functoid returns the value of its second parameter if its first parameter is true, i.e., enables you, based on a Boolean value, to control whether an entire structure or another single value in an input instance message gets copied to an output instance message. The functoid receives two parameters:
    • The first will be a Boolean (True/False);
    • The second is the value to be mapped;
    • If the value of the first parameter is true, then the value of the second parameter is mapped to the destination schema; otherwise, it will not be mapped.
  • Drag a link from the Logical String functoid to the Value Mapping functoid;
  • Drag a link from the element “ZipCode” from the source schema to the Value Mapping functoid;
  • Drag a link from the Value Mapping functoid to the element “ZipCode” in the destination schema;

Custom scripts

  • Custom scripts are commonly used in more complex transformations or to facilitate some mapping conditions. Basically, there are two main scenarios where we can or should use this functoid:
    • When none of the existing functoids allows doing what we want, the example that we will see is converting a date of birth in age.
    • Or when the use of existing functoids becomes extremely complex to solve a problem of mapping.

    There is a “rule” that we normally use to determine whether we should use functoids or custom scripts which tell us: “If you need more than 6 functoids to solve a problem of mapping, you should consider using a script. If you need six or fewer functoids, you should not use a script”.

    I like to use this rule in a thoughtful way and not to the letter, i.e., if the existing functoids help me to easily solve the problem, I use the existing functoids. If it becomes extremely complex, then I choose to use custom scripts.

    The Scripting functoid enables you to use custom script or code at run time to perform functions otherwise not available. For example, you can call a .NET assembly at run time by using the Scripting functoid and writing your own custom functions. BizTalk Server 2010 supports the following languages for the Scripting functoid:

    • C# .NET
    • JScript .NET
    • Visual Basic .NET
    • Extensible Stylesheet Language Transformations (XSLT)
    • XSLT Call Templates

    There are available to the developer six types of scripts:

    • External Assembly: It allows us to associate this functoid with an existing function in assembly published on Global Assembly Cache (GAC).
    • Inline C#: This option allows us to associate and invoke C# code directly into the functoid.
    • Inline JScript .NET: Same as above but using code JScript .NET
    • Inline Visual Basic .NET: Same as above but using code Visual Basic .NET
    • Inline XSLT: This option allows us to associate the Scripting functoid with XSLT.
    • Inline XSLT Call Template: identical to the above, however, it allows us to associate and call XSLT templates directly into the functoid.

    In this example, we want to convert a date of birth in age, for this we need to:

    • Open the Toolbox window and drag the Scripting functoid onto the grid,
    • Drag a link from the element “DateOfBirth” from the source schema to the Scripting functoid;
    • Drag a link from the Scripting functoid to the element “Age” in the destination schema;

    The result should look like:

    BMD-Custom-scripts

    For the mapping problem to be completed, we only need to configure the custom script. For this sample we will use “Inline C #” script type, for this, we need to:

    • Make double-click in the Scripting functoid and select the “Script Functoid Configuration” tab;
    • Go to the “Select script type” drop-down box, and select “Inline C#” option. The “inline script” box will display a sample script;
    • Inside “Inline script” property box place the following script:

Add new values (data)

In many scenarios, we need to add new data to the final message that do not exist in the source message. It is normal to find situations where, based on existing data in the source message, we will need to consult an external system, e.g. database, in order to acquire more information to complete the required data in the final message.

An example, more basic and simple, is to add a stamped date in the final message, describing the date and time it was processed. For this we need to:

  • Open the Toolbox window and drag the Date and Time functoid onto the grid;
  • Drag a link from the Date and Time functoid to the element “ProcessingDatetime” in the destination schema;

BMD-Add-new-values

Note: As you can see, this functoid doesn’t require any input data, returning the current date and time of the system.

Related links

WCF Adapters: In BizTalk Server

Posted: August 14, 2015 in BizTalkServer

WCF Adapters:

The BizTalk Adapters for Windows Communication Foundation (WCF) allow BizTalk Server to communicate with WCF-based applications. The BizTalk WCF adapters include five physical adapters that represent the WCF predefined bindings—BasicHttpBinding, WsHttpBinding, NetTcpBinding, NetNamedPipeBinding, and NetMsmqBinding. The WCF adapters for the predefined bindings are provided to enable you to easily configure necessary information for most application requirements.
The BizTalk WCF adapters also include two adapters that enable you to freely configure WCF binding and behavior information for the receive location and send port.
The BizTalk WCF adapters are:

  • WCF-WSHttp adapter: It Provides the WS-* standards support over the HTTP transport. The WCF-WSHttp adapter implements the following specifications: WS-Transaction for the transactional interactions between external applications and the MessageBox database, and WS-Security for message security and authentication. The transport is HTTP or HTTPS, and message encoding is a Text or Message Transmission Optimization Mechanism (MTOM) encoding.
  • WCF-BasicHttp adapter Communicates with ASMX-based Web services and clients and other services that conform to the WS-I Basic Profile 1.1. The transport is HTTP or HTTPS, and message encoding is a text encoding.
  • WCF-NetTcp adapter Provides the WS-* standards support over the TCP transport. The WCF-NetTcp adapter provides efficient communication in a WCF-to-WCF environment. The adapter implements the following specifications: WS-Transaction for the transactional interactions between external applications and the MessageBox database, and WS-Security for message security and authentication. The transport is TCP, and message encoding is binary encoding.
  • WCF-NetMsmq adapter Provides support for queuing by leveraging Microsoft Message Queuing (MSMQ) as a transport and enables support for loosely coupled applications, failure isolation, load leveling, and disconnected operations.
  • WCF-NetNamedPipe adapter Provides secure optimization for on-machine cross-process communication. The WCF-NetNamedPipe adapter uses transport security for transfer security, named pipes for message delivery, and binary message encoding.
  • WCF-Custom adapter Enables the use of WCF extensibility features. The adapter allows you to select and configure a WCF binding and the behavior information for the receive location and send port.]
  • WCF-CustomIsolated adapter Enables the use of WCF extensibility features over the HTTP transport. The adapter allows you to select and configure a WCF binding and the behavior information for the receive location running in an isolated host.

In addition, BizTalk Server provides the BizTalk WCF Service Publishing Wizard and the BizTalk WCF Service Consuming Wizard. You can use the BizTalk WCF Service Publishing Wizard to create and publish BizTalk orchestrations as WCF services, and to publish schemas as WCF services. You can use the BizTalk WCF Service Consuming Wizard to generate BizTalk Server artifacts, such as orchestrations and types, to consume a WCF service based on the metadata document of the WCF service.

For more deatils about this topic please reffer: https://msdn.microsoft.com/en-us/library/bb259952.aspx

A typical orchestration in BizTalk deals with several kinds of messages. A message in BizTalk is always strongly typed. It is usually associated to some schema defined in the project. A Receive/Send shape in an orchestration is tied to a message declared in the Orchestration View.

When a message created in BizTalk Orchestration is bound to a schema, this is a “typed message”.

In the case of an un-typed message, the message type is set to ‘System.Xml.XmlDocument‘, instead of a schema type. The class “XmlDocument” is a super class for all XML messages, and hence it can hold any type of XML message and subsequently any type of orchestration message. To summarize, an un-typed message is one whose message type is set to “XmlDocument” in an orchestration.

A message is defined by a Document Schema. An XML messages is defined as document schema which has optional extensions for flat files, Electronic Data Interchange file etc. The parsers are enabled by document schema for converting theses documents into their native format into XML.

Message context properties are defined by using a property schema. These properties can be of type MessageDataPropertyBase – the value of property value is promoted from or demoted to the message itself – or MessageContextPropertyBase – the message context contains only the properties.

If you wish to promote a field from a message into the message context then uou need to define a document schema and property schema. In the document schema you promote the required field using the property schema to define the property type that will be used in the message context.

Hi friends today when am deploying my bt project from visual studio am getting following error:

Failed to add resource(s). Change requests failed for some resources. BizTalkAssemblyResourceManager failed to complete end type change request. Unable to install the “C:\Users\Prem\AppData\Local\Temp\BT\PID4952\BizTalkAssembly\de18806cef39a6584e19508b196d9b86\SqlInsertionSample.dll” assembly into the Global Assembly Cache.
Exception: HRESULT_0x800300FA

Only solution to this problem was to close the visual studio solution and then reopen solution, this solved temporally. Issue appears again after second or third deployment.

After doing google, I followed these steps to remove this error.

The below steps resolved the error for me.

1. Remove the temporary files from your PC. (Just go to Run -> type %temp% and delete all the temporary files. Note: Do not delete any directories. Else you will end up with a different error.)

2. Uninstall the previous / current versions of that dll from GAC and redeploy. (While uninstalling the assembly, if you get any error “Cannot Uninstall as it is being used by another process”, then stop the host instance, close all applications and try again. If you still cant delete the dll, restart the PC. :-()

3. Check if the project is using any reference path that does not exist. ( For this, go to project properties -> Select Reference Paths -> Delete any References that doesn’t Exist)

These steps help you in resolving the error.

What if your Internet browser closed unexpectedly when you were composing a big email?
Do you re-compose again? Let us say your email provider saves your composing mail as draft every 15 seconds automatically (e.g. Google mail), wouldn’t you feel it’s a better option?
The process of saving your running orchestration state at a certain point is called persistence, in other words, storing the state into Biztalk database.

Orchestration engine persists your running instance based on how you designed your orchestration. There are few events or stages, which trigger the persistence operation called persistence points.

List of Persistence Points in Orchestration:

Biztalk orchestration engine calls persistence operation on one of the below listed events that occurs:

  • End of a transactional scope (atomic or long running)
  • At debugging breakpoints
  • At the execution of other orchestrations through the Start Orchestration shape
  • At the Send shape (except in an atomic transaction)
  • When an Orchestration Instance is suspended
  • When the system shuts down in a controlled manner
  • When the engine determines it wants to dehydrate
  • When an orchestration instance is finished

In simple words Parallel shape is AND and Listen is OR

In the Parallel Shape, all lanes will begin execution (not really in parallel though) and all lanes must be completed before the Parallel shape will complete.
For more about parallel shape refer below link:
https://msdn.microsoft.com/en-us/library/ee253584(v=bts.10).aspx

In the Listen shape, only the lane activated first, by a Receive Shape or a Delay Shape, will execute.
https://msdn.microsoft.com/en-us/library/ee253551(v=bts.10).aspx

A ‘Delay’ is very much similar to a sleep on the current thread. A ‘Listen’ shape is used to wait for an incoming resource, with a timeout period.

Delay Shape:
The Delay shape (Delay shape) enables you to control the timing of your orchestration. You can set a time-out on the Delay shape so that your orchestration pauses before resuming execution.
There are two ways to specify the timeout for a Delay:

  • You can use System.DateTime, which causes your orchestration to pause until the specified date and time is reached.
    System.DateTime.UtcNow.AddSeconds(60)
    Note: Delays must be expressed in Coordinated Universal Time (UTC) when using DateTime.
  • You can use System.TimeSpan, which causes your orchestration to pause for the specified length of time.
    System.TimeSpan(0, 1, 0)
    Note: If your Delay shape is inside a Listen shape, you do not need to add a semicolon at the end of the expression.
    For more about Delay shape refer below link:
    https://msdn.microsoft.com/en-us/library/ee253483(v=bts.10).aspx

Listen Shape:
Listen actions enable applications to wait for one of several messages on one or more ports, or to stop waiting after a specified time-out interval, and branch based upon the results.
The Listen shape (Listen shape) is used when an orchestration needs to wait for one of a number of events before proceeding. The first shape within a Listen branch must be either a Delay shape or a Receive shape. The first branch for which a condition is met (a delay is reached or a message is received) is followed. None of the other branches run.

You can add as many branches as you like. You can place any other shape below the initial Receive or Delay shape.

It is possible to use an activation receive in a Listen shape. If one branch of the Listen shape contains an activation receive, then all branches must contain activation receives, and no timeout can be used. The activation receive must be the first action in each branch.
To configure a Listen shape
You can use the Listen shape to branch orchestration flow based on the occurrence of one or more events. The first shape in each branch must be either a Delay or a Receive shape. The first branch that meets its condition—the occurrence of a time-out for a Delay shape or the receipt of a message for a Receive shape—will execute. You can add additional branches if needed.

  1. Select a branch.
  2. In the Properties window, specify the Branch Type property.

—Or—
Drag a Delay or Receive shape onto the branch.

https://msdn.microsoft.com/en-us/library/ee253551(v=bts.10).aspx

In my previous posts am explaining about what is BizTalk and some of the developing artifacts like schemas, pipelines, maps and Orchestrations.

This knowledge is enough to start developing BizTalk project. So in this post am going to explain about creating and deploying BizTalk project for messaging solution.

Messaging Solution:

Simple BizTalk Project without Orchestration

Steps:

  • Create SampleBizTalk project in Visual Studio
  • Create Request & Response schemas
  • Create Map
  • Create the input instance file for testing
  • Build and Deploye the application
    • Pre Deployement steps
  • Configure application in BizTalk Admin Console
    • Configuration steps
  • Test the solution

Lets Start Development:

Step:1

  • open Visual Studio –> Click on new project
  • Select BizTalk Empty Project Template

BTProj
Give Project Name –> Click on Ok botton on screen

Step:2

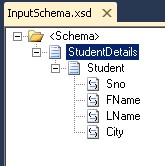
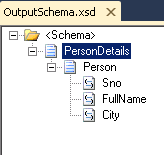
  • Create Following Request and Response Schemas
  • InputSchema.xsd

input

  • OutputSchema.xsd

Output

Step:3

  • Create Map to concatinate FirstName & LastName to FullName

Steps to create map:

  • Right Click on Project Name
  • Click on AddNew Item

AddMap

  • Select Map template from dialog box and give proper name to map
  • click on ok botton
  • Following Map is added to project

MapTemp

  • Click on Open Source Schema and select InputSchema.xsd
    And Click on Open Destination Schema and select OutputSchema.xsd
  • After selecting the schemas, expand the root node to have a visibility of underlying elements

mapinoutschemas

  • Lets give links between source and destination schemas
  • Do a simple concatenation of FirstName and LastName (Source Schema) to FullName (Destination Schema)
  • Drag and drop the String concatenate functoid for tool box
  • Give links FName, LName to concatenate functoid and concatente functoid to FullName at destination.
  • Give direct links between sno and city fields.
  • Final map looks like below figure

mapwithlinks

Creating the instance of the Input message

  • To create an instance, Right click the InputSchema.xsd and Generate instance.

inputinstance

  • The schema’s instance will be generated in the location. The Output window will show the location as:
  • Open instance file and edit whatever test data you want add that data
  • keep ready this file for testing

Deploy the Solution:

  • First step for deploye BizTalk project is creating snk key file for project.

Purpose of Strong name key: You must create a strong name key file to build projects in Microsoft Visual Studio. A strong name consists of the project’s identity — its simple text name, version number, and culture information (if provided) — plus a public key and a digital signature. The strong name key file contains the public key and the private key.

The .snk file is used for signing the assemblies in order to be able to add them to the Global Assembly Cache (GAC).

  • Right click on project click on properties
  • Click on Signin tab on screen
  • Check the check box and click on dropdown list
  • select new


snkeyGen


  • Give Key name and uncheck the ‘Protect my key file with a password’
  • click on ok botton

Snk

  • A new Key will be created in the solution explorer.
  • Now go to deployment tab on screen
  • Provide Application name as SampleBizTalkProject

DeploymentName

  • save all unsaved artifacts..!

Deployment:

  • Now Right click on the Project in solution explorer and click on Build and Deploy

Buil&Deploy

  • The deploy started text will be displayed on Visual studio left bottom
  • Deploy Succeeded after some time

deploysucess

Note: in case of errors please check following steps

  • In case of Access Denied errors, Restart visual studio as administrator
  • please ensure that Biztalk necessary services are up and running

Verify deployment:

  • Open BizTalk Admin console and expand applications tag here you will find your application SampleBizTalkProject.

BTAdmin

Configuring Application

Steps to Configure application in BizTalk Admin Console.

  • Click on all artifacts one by one and verify all components are successfully added or not.
  • Create Receive and Send Ports in BizTalk Admin Console

Steps to configure Receive Ports and Receive Location:

  • Create new receive port

BTAdmin

  • Right click on receive port and click on new –> click on One-way Receive Port

ReceivePort1

  • In general tab rename the receive port name = RP_ReceiveREQ
  • Click on apply button.
  • Create Receive Location
  • Click on Receive Location on same window and click on new

RL1

  • Next step configure Receive location as below

RL2

  • Give the RL Name –> Select the adapter type as FILE
  • Click on Configure button  after selecting FILE adapter and provide the location of Input folder

ConfigeFileAdapter

  • Click on ok on the all under laying windows
  • Make sure Receive location is available as below

RL

Steps to configure Send Ports:

The Message will be picked up by the File based Receive Adapter>> It will be transmitted to Receive port and Delivered to message box

Now we need to subscribe to this delivered message through any of the Context properties(BTS.ReceivedFileName) to apply the Outbound map. Here the map will be applied in the send port.

  • Create a Send port as below

SP

  • Click on Static One-way send port and rename as ‘SPSendPort’ and make all configurations as below

SP2

  • Click on the Configure button and provide the Output folder location

SP3

Configure map in send port

  • Click on the outbound maps in the same window on the left pane
  • Select the map as shown below

OutBoudMap

  • Click on apply and ok

Configuring Filters in send Port

Filters are the ones which subscribes to the messages from Message-Box

  • Go to filters tab on left pane in same window and select the context property ‘BTS.ReceivedPortName’ from drop down

Filters

  • We can select any context properties(like BTS.MessageType) based on your requirement
  • Apply all the settings and click on ok on all windows

After completing all above steps starts the application and test it.

Testing the Solution:

As we are done with all configuration part, now it’s time to test the entire solution.

  • Copy the instance file which you have generated in the previous task
  • Place the file in the Input folder configured in receive location
  • The file will be immediately picked up and output will be transformed and placed in the output folder with unique MessageID as name.

Hope this helps people who start learning BizTalk…!

When am learning BizTalk I have always wondered what Group Max Occurs and Max Occurs did.

First am going to explain about Max Occurs:
When you set Max Occurs then that particular element/record will repeat as per the Max Occurs, as below:

maxoccur

In this schema am setting Max Occur value to unbound and min occur as ‘0’.

The sample XML produced by this schema is below with 3 Address nodes:

SchemaOut

So from this we got idea what max occur does.

Group Max Occurs:

I have changed the schema to use Group Max Occurs.

GroupMax

In this schema am setting Group Max Occur value to ‘unbound’ and Group min occur as ‘0’.

The sample XML produced by this schema is below with 1 Address nodes and multiple Address1 and Address2 tags under Address record:

OutGMax

Conclusion:

when you set Max Occurs then that particular element/record will repeat as per the Max Occurs value and Suppose you set Group Max Occurs of Address to unbound , then the elements(elements within the records are referred as group)in Address record i.e. Address1 and Address2 fields will repeat.

I hope this post helps to understand what Group Max Occurs and Max Occurs did..!